
The Guitarist's Body Blueprint: How Your Posture, Setup, and Body Mechanics Shape Your Sound (And Your Musical Longevity)
The tightness in your shoulder isn't separate from the music you're trying to make.

Your body is part of the instrument. Treat it like one.
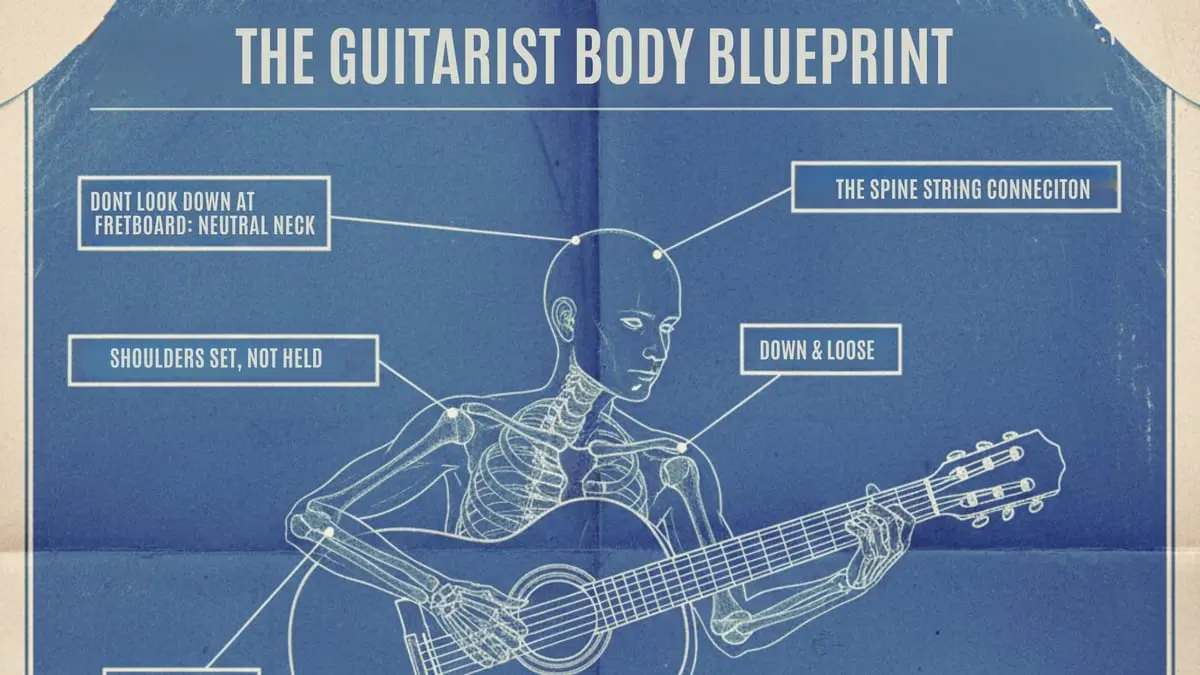
The Guitarists Body Blueprint
What This Post Covers:
Here's something I learned the hard way, working with musicians for over fifteen years: most guitar players think about their instrument in isolation.
They think about strings, frets, pickups, tone. They obsess over gear. They practice scales and chord changes and theory. All good stuff.
But they completely ignore the delivery system.
Your body isn't just holding the guitar. It's translating intention into sound. Every note you play travels through a chain of bones, joints, muscles, and fascia before it ever reaches your fingers.
And if that chain is compromised, if your posture is collapsed, if your shoulder is hiked up, if you're gripping instead of holding then you're not just risking injury.
You're limiting your expression. You're making it harder to play the music that's actually in your head.
This post is going to walk you through the architecture of playing guitar and your body. Not theory. Not abstract biomechanics. Practical stuff you can actually use.
We're going to talk about fascia (the web of tissue that connects everything), about posture (sitting vs standing and why it matters), about the spine-to-string connection that most people never think about, and about the small setup adjustments that make a massive difference.
By the end, you'll have a framework: a blueprint for playing guitar in a way that supports both your longevity and your creativity. Because those two things aren't separate.
They never were.
What you'll learn in this post:
- Part 1: The Hidden Architecture
- Part 2: Sitting vs Standing
- Part 3: The Spine-to-String Connection
- Part 4: Small Changes, Big Sound
- Part 5: Tools & Setup Checklist
Part 1: The Hidden Architecture (Fascia + Posture)
What the Hell Is Fascia Anyway?
Okay, so fascia. You've probably heard the word thrown around: maybe in yoga classes or physio appointments or those weird foam rolling videos.
But most people don't really understand what it is or why it matters for guitar playing.
Here's the simple version: fascia is the connective tissue that wraps around and through every muscle, organ, and structure in your body. Think of it like a three-dimensional web.
It's not separate components: muscle here, tendon there, bone somewhere else. It's all connected through this continuous network of fascial tissue.
And here's why that matters for you: when you play guitar, you're not just using your fingers. You're using your whole body.
The tension in your jaw affects your shoulders. Your shoulders affect your arms. Your arms affect your wrists. Your wrists affect your fingers. It's all one system.
I've worked with so many guitarists who come in complaining about wrist pain or finger pain, and we end up working on their hips. Or their ribs. Or their neck.
Because the problem isn't always where they feel it. The problem is somewhere up the chain, creating compensation patterns that eventually show up as pain in the hands.
Your fascia carries tension like a spiderweb carries dew. Touch one part and the whole thing responds.
So if you're constantly sitting with rounded shoulders and a collapsed chest (which, let's be honest, describes most of us when we're practicing), that's creating tension patterns throughout your entire upper body.
And eventually, your hands pay the price.
Get a deeper understanding of fascia here on my post on your body's hidden web.
The Postural Patterns That Kill Your Playing
Let me describe someone. See if this sounds familiar:
They're sitting hunched forward, guitar resting on their right leg (if they're right-handed), body twisted slightly to see the fretboard better.
Their left shoulder is rolled forward and slightly elevated.
Their neck is craned down. Their right shoulder is hiked up to maintain picking position.
Their lower back has no support and is basically just collapsing into the chair.
That's probably 80% of guitar players I've ever worked with.
And look, I'm not saying this to make you feel bad. I'm saying it because this pattern is so common that we think it's normal. We think, "Well, that's just how you sit when you play guitar."
But it's not. Or it doesn't have to be.
Here's what's actually happening in that position:
- Your thoracic spine (mid-back) is locked into flexion. That means your ribcage can't expand properly, so your breathing is compromised.
- Your shoulders are protracted (rounded forward), which puts your rotator cuff in a mechanically disadvantaged position and creates constant low-level tension in your neck and upper traps.
- Your head is forward, which means the muscles at the base of your skull are working overtime to hold it up - about 10-12 pounds of weight that's now positioned way in front of where it should be.
- Read my post on the best playing posture for more guidance on how to setup
All that tension has to go somewhere. And where it goes is down the chain. Into your arms. Into your wrists. Into your hands.
So when your fingers start hurting after an hour of practice, it's not just because your fingers are weak.
It's because they're at the end of a kinetic chain that's been working against itself the whole time.
The Three Postural Foundations
Alright, so what do you do about it? Here are the three foundations I teach every guitar player I work with:
Foundation 1: Neutral Spine
Your spine has natural curves: cervical (neck), thoracic (mid-back), lumbar (lower back). When you're in neutral spine, those curves are maintained, not exaggerated or flattened.
You're not ramrod straight like a soldier, but you're not slumped either.
To find neutral:
- Sit on the edge of a firm chair.
- Feel your sit bones (the bony prominences at the bottom of your pelvis).
- Rock forward and back on them until you find the spot where you're balanced right on top of them: not behind, not in front.
- That's neutral pelvis, which gives you neutral lumbar spine. Let everything else stack up from there.
Foundation 2: Ribs Over Pelvis
Your ribcage should be stacked over your pelvis, not thrust forward or collapsed back.
When you're aligned this way, your breathing is easier, your core can actually function (instead of just gripping), and your shoulders have a stable base to work from.
Quick check:
- Put one hand on your sternum (breastbone) and one on your pubic bone. They should be roughly aligned vertically.
- If your ribs are thrust forward or your chest is collapsed, you're out of alignment.
Foundation 3: Shoulders Set, Not Held
Your shoulders should be drawn back and down but not forcefully held there.
This isn't a military posture. It's a relaxed, settled position where your shoulder blades are sitting in their optimal spot on your ribcage.
Think of it like this: shrug your shoulders up toward your ears. Now let them drop. Now draw them back just slightly maybe an inch. That's set.
Now relax everything while maintaining that position. That's the difference between held and set.
When your shoulders are set properly, your arms hang from a stable structure instead of fighting to hold themselves up.
That's where efficiency lives. That's where endurance comes from.
Part 2: Sitting vs Standing: How to Choose Wisely
The Case for Sitting
Let's talk about sitting first, because that's how most people practice and how most bedroom guitarists spend their time.
Done right, sitting can be excellent for guitar playing. You've got support. You've got stability. You can practice for longer periods without your legs getting tired.
And for detailed technical work, like learning new pieces or working on intricate fingerpicking patterns, sitting gives you the kind of sustained focus that's hard to maintain while standing.
But here's the thing: most people sit terribly.
They sit on soft couches that don't provide any structural support.
They sit with the guitar resting on their right leg (for right-handed players), which means they have to twist their spine and collapse their left shoulder just to see what they're doing.
They sit for hours without moving, which means their hip flexors shorten, their glutes turn off, and their lower back takes all the load.
So if you're going to sit, do it properly:
Use a firm chair.
Not a couch. Not a stool without a back (unless you've got really solid core control). A proper chair with a flat, firm seat and back support.
Keep your feet flat on the floor.
Both of them. This gives you a stable base and keeps your pelvis level. If you're short and your feet don't reach get a lower chair.
Take breaks.
Every 20 minutes, stand up. Walk around. Do some shoulder rolls. Let your hip flexors open up. Then come back.
Heres my post on why you should try 20 minute practice sessions more frequently rather than long one hour marathon sessions. But if you're going to do a longer session make sure you build in breaks
The Case for Standing
Standing changes everything. Your weight is distributed differently. Your relationship to the guitar is different.
Your movement options are completely different.
I actually think most people should spend at least some of their practice time standing, even if they prefer to sit.
Why? Because standing keeps you mobile. It keeps your whole body engaged. It's harder to collapse into bad postural habits when you're standing because you don't have a chair to lean against.
Plus, if you ever play with other people or perform in any context, you're probably standing. So it makes sense to practice that way at least some of the time.
But standing has its own challenges:
Weight distribution matters.
Don't stand with all your weight on one leg (usually the right leg for right-handed players). Keep your weight balanced between both feet.
Let your knees be soft, not locked. Think of your stance as alive, not rigid.
Strap height is crucial.
If your guitar is hanging down by your knees because you think it looks cool, I'm going to be blunt with you: it's terrible for your body.
Your left arm has to reach down and forward, which internally rotates your shoulder and puts strain on your rotator cuff.
Your right arm is in an awkward position for picking.
Your neck has to crane down to see what you're doing.
Raise that strap. Get the guitar up around the height where it would sit if you were sitting with proper posture.
I know it's not "rock star" positioning. But you know what's also not rock star? Not being able to play because you've got chronic shoulder tendonitis.
Move.
The advantage of standing is that you can move. You can shift your weight. You can take a step. You can rotate your torso slightly. Use that. Don't stand like a statue. Let your body be fluid.
If your looking for even more detail and how adjusting your setup can make a big difference up you can check out my mini post on Guitar Comfort Secrets
So Which One Should You Do?
Both. Honestly. Sit for detailed technical work, for long practice sessions, for focused learning.
Stand for playing songs you know well, for jamming, for building performance stamina.
And most importantly, switch between them. Don't spend three hours in one position. Your body needs variety.
It needs different movement patterns, different load distribution, different demands.
The best position is the next position. Keep changing. If you want a detailed step by step postural optimization sequence you can apply along with a proven system to go from pain in your playing to confident pain free performing you can explore my book Keep Playing
Part 3: The Spine-to-String Connection
How Your Core Actually Works (And Why It Matters)
Alright, we need to talk about your core. And I don't mean abs. I mean your actual core: the deep stabilizing system that connects your spine to your pelvis and your ribcage and creates the stable platform from which your arms can move.
Most people think of core work as crunches and planks. That's fine for general fitness, but it's not what I'm talking about here.
I'm talking about the deep core muscles, your transverse abdominis, your pelvic floor, your multifidus, your diaphragm, that work together to create what's called "intra-abdominal pressure."
This is the internal pressure that stabilizes your spine without you having to consciously hold it rigid.
When your core is functioning properly, your spine is stable.
When your spine is stable, your shoulders have a solid foundation to move from.
When your shoulders move from a solid foundation, your arms can be efficient.
When your arms are efficient, your hands can be precise without having to grip or compensate.
See how it all connects?
But here's what happens with most guitar players: they sit down, they collapse their posture, and their core basically turns off.
Now their arms are trying to work from an unstable base. So they compensate by gripping with their shoulders, with their forearms, with their hands.
That gripping creates tension, and that tension creates pain.
The Breath-Posture-Tension Loop
Let me tell you about something I noticed years ago in my practice: almost every musician who came in with chronic pain was a shallow breather.
They were breathing up in their chest, not down in their belly. Their ribcage was barely moving. Their diaphragm, which is a core muscle, by the way wasn't really doing its job.
And it makes sense, right? If you're sitting in collapsed posture, hunched over your guitar, your ribcage is compressed.
There's no room for your lungs to expand properly. So you breathe shallow and fast. And shallow, fast breathing is what your nervous system associates with stress and threat.
So now you're in this loop: poor posture leads to poor breathing, poor breathing signals stress to your nervous system, stress creates more tension, more tension reinforces poor posture. Round and round.
Breaking that loop starts with breathing.
Not fancy breathing techniques. Just normal, diaphragmatic breathing where your belly expands on the inhale and relaxes on the exhale.
Heres the method I use for performing, its worth a read if your looking to explore more on the breath body connection when playing: From Chaos to Rhythm: The Breath‑Body‑Beat Method for Confident Performing
You'd be shocked how much tension releases just from breathing properly while you play.
Try this right now:
Sit in your normal playing position.
Take five slow breaths where you focus on letting your belly expand on the inhale (not your chest - your belly). Don't force it. Just allow it.
Notice what happens to your shoulders. Notice what happens to your jaw. Notice what happens to your hands.
That's the spine-to-string connection. Everything's related.
The Shoulder Blade-Arm Link
Your shoulder blade (scapula) sits on your ribcage. It's not locked in place, it's designed to move and glide and rotate as your arm moves.
But it's only stable when your thoracic spine is in good position and your core is providing a firm foundation.
When you're collapsed forward, your shoulder blade wings off your ribcage. Now it's not stable. Now your rotator cuff muscles have to work overtime to try to stabilize it while also moving your arm.
That's a recipe for impingement, tendonitis, and chronic shoulder pain.
Here's what I tell people: your shoulder blade should be your anchor point.
When you're playing, you should feel like your arm is hanging from a stable shoulder blade that's sitting properly on your ribcage.
Not held in place forcefully. Just settled there, doing its job.
When that's happening, your arm can move with minimal effort. Your wrist can be neutral.
Your fingers can do their work without your entire upper body tensing up to support them.
That's efficiency. That's longevity. That's how you play for decades without things breaking down.
Part 4: Small Changes, Big Sound: Micro-Adjustments for Pain-Free Playing
The 80/20 of Guitar Ergonomics
Here's what I've learned: you don't need to overhaul your entire setup to see massive improvements.
Most of the benefit comes from a handful of small adjustments that you can make right now, today, without buying anything.
These are the micro-adjustments that matter:
Adjustment 1: Guitar Height
Whether sitting or standing, get your guitar higher.
Most people have it too low. This forces your left shoulder forward and down (for right-handed players), creates tension through your entire left side, and makes your right arm work harder than it needs to.
If sitting: The guitar should rest high enough that your left forearm is roughly parallel to the floor when your hand is in first position. Not angled down. Not reaching.
If standing: Raise your strap until the guitar sits at the same height it would if you were sitting with proper posture. Test it: sit down with good posture, note where the guitar sits, then stand up and adjust your strap to match.
Adjustment 2: Chair Height
If you're sitting, your thighs should be parallel to the floor or very slightly angled down toward your knees.
If your knees are higher than your hips, your chair is too low - this tilts your pelvis backward and collapses your lumbar spine.
If your feet don't comfortably reach the floor when your thighs are parallel, your chair is too high. Get a footrest or a lower chair.
This seems minor. It's not. Chair height affects your entire postural chain.
Adjustment 3: Neck Angle
Stop looking down at the fretboard by craning your neck. If you need to see what you're doing (and sometimes you do), tilt the entire neck of the guitar up slightly toward your face.
Don't drop your head down to meet the guitar - bring the guitar up to meet your eyes.
Better yet, work on playing more by feel and less by sight.
Your proprioception (your body's sense of where it is in space) is more reliable than your eyes once you develop it. And it doesn't require you to compromise your neck position.
Adjustment 4: Thumb Position
Your left thumb (for right-handed players) should be behind the neck, roughly opposite your middle finger, providing gentle counterpressure to your fingers.
It should not be gripping. It should not be wrapped over the top of the neck unless you're specifically doing a thumb-over technique for a particular passage.
Most people grip with their thumb.
This creates unnecessary tension through the entire hand and forearm. Relax your thumb. Let it rest, not grip. Your fingers will work better, not worse.
Adjustment 5: Pick Grip
Hold your pick firmly enough that it doesn't slip. Not firmly enough that your entire hand is tense. Most people grip way too hard.
Test: Play something while consciously relaxing your pick grip by about 20%. Does the pick slip? If not, you were gripping too hard. Keep relaxing until you find the minimum grip needed for control. That's your target.
If you want a complete guide which goes into more detail
The Reset Micro-Practice
Here's something I want you to start doing between every song, every exercise, every passage you're working on:
Stop. Put the guitar down or let your hands drop to your lap.
Take three slow breaths. Roll your shoulders back and down. Notice where you're holding tension. Consciously release it. Now pick the guitar back up with fresh awareness.
This takes 15 seconds. It breaks the accumulation of tension that builds up over the course of a practice session.
It reminds your nervous system that playing guitar doesn't have to be accompanied by gripping and bracing.
Do this between every single thing you play for one week. Watch what happens to your endurance and your comfort level.
Part 5: Tools & Setup Checklist
Gear That Actually Matters (And Gear That Doesn't)
Look, I'm not a gear guy in the sense of chasing tone or collecting vintage instruments.
But I am a gear guy in the sense of understanding that the right tools can make your body's job easier. So let's talk about what actually matters from a physical standpoint.
Guitar Weight:
If you've got chronic shoulder or back issues, consider a lighter guitar. A heavy Les Paul might sound amazing, but if it's pulling your shoulder down after 30 minutes, it's working against you.
There are excellent lightweight alternatives that don't compromise tone.

Strap Width and Material:
A wider strap distributes weight better than a thin one. Neoprene or padded straps are worth the investment if you stand for long periods. This isn't about comfort - it's about preventing the constant low-level strain that accumulates into injury.
Guitar Support Systems:
If you sit to practice, consider a guitar support cushion (Gitano, Dynarette, ErgoPlay). These keep your spine neutral and your shoulders even, which matters a lot more than you probably think.
Action Height:
If your action is too high, you're having to press harder than necessary with your fretting hand. That extra force compounds over time.
Get your guitar properly set up. Pay for a professional setup if you don't know how to do it yourself. It's worth every penny.
String Gauge:
Lighter strings require less finger pressure to fret. If you've got arthritis, joint issues, or you're rebuilding after injury, go lighter.
You can always go heavier later. There's no prize for using thick strings if they're making your hands hurt.
Seating:
If you practice sitting, invest in a proper chair. Not a stool. Not a couch. A chair with a firm, flat seat and back support. Office chairs can work if they're adjustable and supportive.
Kitchen chairs work. Whatever you use, it should allow you to sit with neutral spine and feet flat on the floor.
Your Pain-Free Setup Checklist
Here's a checklist you can run through before every practice session. This takes 30 seconds and prevents hours of accumulated tension:
Position Check:
- [ ] Chair height allows thighs parallel to floor, feet flat
- [ ] Sitting on sit bones, not slouched back into chair
- [ ] Spine neutral (natural curves maintained)
- [ ] Ribs stacked over pelvis
- [ ] Shoulders back and down, not held or hunched
Guitar Check:
- [ ] Guitar high enough that left forearm is roughly parallel to floor (if right-handed)
- [ ] Guitar centered on body, not twisted to one side
- [ ] Neck angle allows you to see fretboard without craning neck down
- [ ] Strap adjusted to same height as sitting position (if standing)
Hand Check:
- [ ] Left thumb behind neck, not gripping (if right-handed)
- [ ] Pick grip firm but not tense
- [ ] Wrists relatively straight, not bent at extreme angles
- [ ] Fingers curved, not hyperextended or collapsed
Breath Check:
- [ ] Breathing diaphragmatically (belly expanding on inhale)
- [ ] Not holding breath during difficult passages
- [ ] Jaw relaxed, not clenched
Run through this checklist. It becomes automatic after a while, and it keeps you honest about your positioning.
Or download my FREE Guide which covers this in an easy to follow format:
Bringing It All Together: The Blueprint in Action
What This Actually Looks Like
Alright, so we've covered a lot of ground here.
Let's bring it back to something practical you can actually implement.
Here's what a body-aware practice session looks like:
Before you start:
Run through your setup checklist. Get your positioning right. Take three intentional breaths.
Set an intention for the session - not about what you'll accomplish, but about how you'll show up. "I'm going to stay aware of my shoulders today." "I'm going to notice when I start gripping and consciously release."
Whatever feels relevant.
During practice:
Check in with your body every 10-15 minutes. Quick scan: Where's the tension? What's my breathing like? Am I still in good position or have I slowly collapsed?
Make adjustments. Don't wait until something hurts. Prevent the tension from accumulating in the first place.
Between exercises:
Do the reset micro-practice. Put the guitar down or rest your hands. Three breaths. Roll shoulders. Release tension.
Pick it back up with fresh awareness.
After practice:
Don't just stop and walk away. Do some gentle stretches. Roll your wrists. Interlace your fingers and press your palms away from your chest.
Circle your shoulders. Take a minute to notice how your body feels. This is data. This tells you what worked and what didn't.
The Long Game
Here's the thing I want you to understand: this approach: paying attention to your body, maintaining good positioning, making these small adjustments , it's not about being precious or careful or fragile.
It's about being smart. It's about playing the long game.
You can force your way through for a while. You can ignore the warning signs, push through discomfort, tell yourself it's fine.
And maybe it will be fine. For a while.
But eventually, the body sends a bill. And that bill comes in the form of chronic pain, injury, forced time off, and the very real possibility that you won't be able to play anymore.
I've seen it happen to too many people. Talented players. Dedicated musicians.
People who loved playing guitar more than almost anything else. And they had to stop because they didn't pay attention until it was too late.
You don't have to be one of those people.
The blueprint is simple: respect your body's architecture. Set yourself up for success. Pay attention to the signals before they become screams. Make the small adjustments that prevent the big problems.
Do this, and you can play guitar for the rest of your life.
Not despite your body, but in partnership with it.
That's the real blueprint. That's what all of this has been about.
Your Invitation + Downloads
If you're ready to actually implement this stuff - not just read about it, but do it - I've got resources that can help.
Want the free checklist?
👉 Download Play Without Pain which has a Pain-Free Setup Checklist - a printable one-page guide you can keep near your practice space. Covers everything we talked about in an easy reference format.
Ready to go deeper?
👉 Grab Keep Playing on Payhip - the complete handbook with detailed protocols, exercises, and the full body-aware practice system. This post is the overview. The book is the complete blueprint.
And if you've got questions about your specific situation: your pain, your setup, what's not working hit reply and tell me. I read everything. Sometimes just describing the problem out loud helps you see the solution.
Your body isn't separate from your music. It's the instrument that plays the instrument.
F.P
Founder, Gentle Octaves

F.P. O’Connor
F.P. O'Connor is a Musician and Movement Specialist whose work is informed by extensive training in Manual Osteopathy, Psychology, and Strength Coaching.
He is the founder of Gentle Octaves, helping adult players develop practical, science-based systems for ease, control, and long-term playing confidence.
Gentle Octaves | Pain-free music for adult musicians
Release → Reset → Rebuild™ your sound.
www.gentleoctaves.com
FAQ
Q: Do I really need to change my entire setup if I’m not in pain?
Not necessarily, but small adjustments made early are far easier than fixing problems later.
Pain is a late signal. Most playing-related issues build quietly through posture collapse, inefficient reach, and unnecessary tension long before symptoms appear.
You don’t need to overhaul everything but if your setup encourages hunching, overreaching, or constant gripping, you’re likely accumulating strain even if you feel “fine” right now.
If your posture degrades as you play longer, your setup is already costing you something.
Q: I’ve been playing the same way for 20 years — isn’t it too late to change?
Not at all, the nervous system can learn new movement patterns at any age.
What you’ve built over decades is habit, not destiny.
Musicians relearn fingerings, rhythms, and styles all the time and posture and movement patterns are no different. Change requires conscious attention at first, then repetition, then patience. That’s how long-standing habits actually shift.
If you can learn a new song, you can learn a better way to hold the instrument.
Q: What if proper positioning feels awkward or “wrong”?
That’s normal: “natural” usually means familiar, not optimal.
Your body adapts to whatever you repeat. If you’ve played in a collapsed or tense position for years, efficient positioning will initially feel unfamiliar or unstable.
That doesn’t mean it’s wrong, it means your nervous system hasn’t adopted it yet.
Most players need 1–2 weeks of consistent exposure before a new position begins to feel natural. Awkward becomes comfortable. Comfortable becomes automatic.
Judge a position by how it feels after playing not how strange it feels at first.
Q: Can better posture and setup actually improve my playing, or is this just about avoiding injury?
Both. Efficient posture improves control, endurance, and technical freedom.
Tension limits movement options.
When posture improves, players often notice:
- cleaner fretting
- lighter grip
- smoother transitions
- better timing
- more endurance
- less mental effort
This isn’t just about staying out of pain it’s about unlocking capacity that was being restricted by inefficient mechanics. If playing feels easier, performance is already improving.
Q: How does setup relate to the Release → Reset → Rebuild™ system?
Your setup determines whether the body can maintain healthy patterns or constantly compensate.
A poor setup forces the body to brace and overwork which undermines every phase of recovery.
Good setup:
- supports Release by reducing baseline tension
- reinforces Reset by making efficient patterns easier
- protects Rebuild by distributing load intelligently
Setup isn’t cosmetic. It’s foundational. If a position requires effort just to hold, it won’t last under load.
Q: Should I fix posture first, or work on exercises and mobility?
They work best together, but posture sets the context for everything else.
Mobility and strength help but if your playing posture constantly reinforces collapse or overreach, the gains won’t stick.
Think of posture and setup as the environment your body trains in. Fix the environment, and everything else works better.
If exercises help briefly but playing brings symptoms back, posture deserves attention.
Q: How long does it take for setup and posture changes to feel “normal”?
Most players adapt within a few weeks of consistent use.
Initial awareness feels effortful.
After repetition, the nervous system recalibrates.
What once felt “wrong” becomes your new baseline — often with less fatigue and more control than before. Consistency beats perfection during the adjustment phase.
Q: What’s the biggest mistake players make with posture and setup?
Trying to correct everything at once.Overcorrection creates tension.
The body learns best with small, sustainable changes layered over time. One or two adjustments that stick are far more valuable than a perfect setup you abandon.
Change one thing, let it settle, then build.
Sources & Science
Myers, T. W. (2014). Anatomy Trains: Myofascial Meridians for Manual and Movement Therapists (3rd ed.). Churchill Livingstone.
Sahrmann, S. A. (2002). Diagnosis and Treatment of Movement Impairment Syndromes. Mosby.
Norris, R. (1993). Applied ergonomics: Adaptive equipment and instrument modification for musicians with upper limb impairments. Medical Problems of Performing Artists, 8(2), 41-46.
Lederman, R. J. (2003). Neuromuscular and musculoskeletal problems in instrumental musicians. Muscle & Nerve, 27(5), 549-561.